15. Screenshot
15.1. Take a screenshot
You can take a screenshot of the current WebGL screen state and save it.
Open the Home or Display tab of the Ribbon bar.
Click “Capture” on each tab.
Home tab |
Screen tab |
|---|---|
|
|


To view the screenshots you have taken, click “List”.
Screenshots will be displayed in a separate window.
Hint
With mobile terminals such as smartphones and VR devices such as MetaQuest3, you can also take pictures using the standard screen recording and screenshot functions of each model.
Note
On the home tab, there is only a “capture” button that is likely to be used often.
If you check “ Make Transparent “ in the background options, you can make the sky and ground transparent.
IK markers are automatically cut without changing settings.
15.2. look
The screenshots you take are saved in the app. All can be viewed in a separate window and saved as needed.
Click “List” on the screen tab of the ribbon bar to open it.

- What you can do:
display in chronological order
Update to the latest state (because shooting on the main screen is not immediately reflected in another window)
Remove
Save to local disk
Share (from ver 2.3.0)

Hint
If there is more than one Camera object, previewing with one of them will make that image the target of the screenshot. When you stop previewing everything, it will return to the image from the main camera.
Since the preview in the viewport and render texture is also reflected, please turn on “Take screenshots with HTML function” in the settings as necessary. Then, the screen shot will be taken as it is (including the camera object viewport and render texture) on the WebGL screen.
15.3. Search
The screenshots taken are managed in date order, and it is possible to search for specific dates from the calendar.
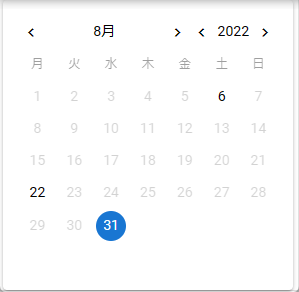
Dates with screenshots are darkened and clickable.
Click the darkened date.
The displayed contents of the screenshot list are updated, and the screenshots for the selected date are displayed.
15.4. Save
Select the screenshot you want to save.
Press this button
 on the toolbar.
Note
When using from a browser, you can also copy the image to the clipboard and use other functions by right-clicking.
15.5. Share
From ver 2.3.0, image sharing is supported. It can only be used from a browser.
Select the screenshot you want to share.
Press the
 share button on the toolbar.
A sharing function window will be displayed for each OS, so select the app you want to send.